How to Allow Users to Subscribe to Authors in WordPress

How to Allow Users to Subscribe to Authors in WordPress ?

Have you ever wanted to allow users to subscribe to specific authors in WordPress?

If you run a multi-author WordPress site, then your users may want to subscribe to their favorite author. In this article, we will show you how to allow users to subscribe to individual authors in WordPress.

Why Add Subscribe to Authors in WordPress?

Most large multi-author blogs like Huffington Post allow users to follow their favorite authors. You can offer this feature in your multi-author WordPress site as well.

WordPress generates RSS feeds for all authors, categories, tags, custom post types, and comments on your site.

However, your users can’t see these feeds link without knowing where to look.

As a site owner, you just need to add links and subscription options so that users can subscribe to authors.

Having said that, let’s take a look at how to allow users to easily subscribe to authors in WordPress.


Subscribe to author

Adding Subscribe to Authors Feature in WordPress

All the authors on your WordPress site have an RSS feed of their own. This RSS feed is located at a URL like this:

http://www.example.com/author/tom/feed/

Don’t forget to replace ‘tom’ with an existing author’s name on your site.

Many WordPress themes come with a section that displays author’s biographical information at the end of the article. You can add this HTML code in an author’s bio section to display a link to their RSS feed.


1 <a href="http://www.example.com/author/tom/feed">Subcribe Tom's Posts</a>

Adding a subscribe to author link in author bio section


You can also automatically generate the link and use a shortcode to manually insert it into posts.

First, you need to add this code to your theme’s functions.php file or a site-specific plugin.


01 // Function to generate author's RSS feed link
02
03 function wpb_author_feed() {
04
05 $authorfeed = get_author_feed_link( get_the_author_id(), '');
06
07 $authorfeedlink = '<a href='. $authorfeed . '>Subscribe to get more posts from ' . get_the_author_meta( 'display_name') .'' ;
08
09 return $authorfeedlink;
10
11 }
12 // Create a shortcode to display the link
13 add_shortcode('authorfeed', 'wpb_author_feed');
14
15 // Enable shortcode execution in WordPress text widgets
16 add_filter('widget_text', 'do_shortcode');


You can now just use the shortcode [authorfeed] in your posts, and it will automatically generate a link to the post author’s RSS feed. Feel free to customize the text you want to display for the link.


Subscribe to author link

Add a Subscribe to Author Link in the Sidebar

We will be using the shortcode method we showed above to display a subscribe to author link in the sidebar of your WordPress blog. Simply go to Appearance » Widgets page and add a text widget to your sidebar.

Adding subscribe to author link in WordPress sidebar widget

You will need to add [authorfeed] shortcode in the text area of the widget. After that, don’t forget to click on the save button to store widget settings.

You can now visit your website to see the sidebar in action.

The problem with this method is that it will display the widget on every page including the homepage, category, and tag archives, etc.

You need to install and activate the Display Widgets plugin. For more details, see our step by step guide on how to install a WordPress plugin.

Upon activation, you need to visit the Widgets page and edit the author’s feed widget you added earlier.

Display widget rules

You will notice new options to control widget display on different pages of your site. Now you need to select ‘Show on checked pages’, and then check the single post option.

Don’t forget to click on the save button to store your widget settings.

That’s all you can now visit your website to see your author subscription link in action. You can use a little CSS to create a button, or add an image icon as the subscription.

If you liked this article, then please find us on  Facebook, Twitter, Google+

How to Connect Constant Contact to WordPress

How to Connect Constant Contact to WordPress (Step by Step)

Special WordPress Hosting offer for WPBeginner ReadersHow to Connect Constant Contact to WordPress (Step by Step)

Are you using ConstantContact for your email marketing? Want to connect ConstantContact with your WordPress site?

In this ultimate guide, we will show you how to connect ConstantContact with WordPress.


Using Constant Contact with WordPress - The Ultimate Guide

Using Constant Contact with WordPress – The Ultimate Guide

Why Building an Email List is so Important?

Have you ever wondered that why every website on the internet wants to have your email address?

Whether you are creating an account on Facebook, Twitter, or New York Times, they all want your email address.

The answer is dead simple. Email is the best way to reach your customers.

A recent study showed that small businesses get $40 back for every dollar spent on email marketing.

It is the most effective way to convert visitors into customers.

You can learn more about this topic by reading our article on why you should start building your email list right away.

Now that you know the importance of building an email list, let’s see how to get started with Constant Contact to build an email list for your WordPress site.

What is Constant Contact?

Constant Contact is one of the most popular email marketing service providers in the world.

They specialize in sending mass emails to your customers, manage your email lists, and run effective email marketing campaigns.

It can be quite overwhelming for small businesses to start their own email list. Constant Contact makes sure that even absolute beginners can run their email campaigns like a pro.

It is a paid service with a free 2-month trial. After the trial period, pricing starts as low as $20 per month.

How to Set up Constant Contact

Sign up for a Constant Contact account

First, you need to visit Constant Contact website and sign up for an account.

Sign up for a Constant Contact account

Upon signing up, you will land on the Constant Contact dashboard. You will see three simple steps to help you get started.

Constant Contact dashboard

Step 1: Setting up your first email list

First, you need to click on ‘Set up your first list’ link. This will bring up a popup where you need to provide a name for your email list and some email addresses to add to it.

Next, click on the save list button to continue.

Step 2: Add your organization info

The CAN-SPAM act requires a valid postal address in all outgoing marketing emails. Constant Contact makes it easy for you to comply with this law by providing your organization info.

Constant Contact will then automatically add this information in the footer of your emails.


Add your organization information


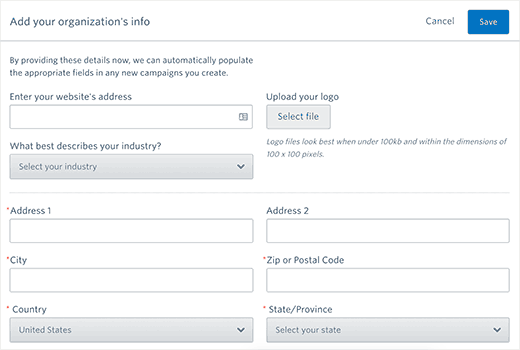
You need to click on ‘Add your organization info’ link. It will take you to a form where you need to provide your business information.

Add your organization information

You will need to provide your website address and postal address. You will also be asked to select an industry for your business and upload an image logo.

Don’t forget to click on the save button to store your settings and continue to the next step.

Step 3: Send your first email

Lastly, you need to click on ‘Send your first email’ link.

Constant Contact will show you a number of beautiful email templates to choose from.

Select a template for your first email

This will open the template in Constant Contact’s live WYSIWYG email composer. This drag and drop design tool allow you to easily design your email.

First, you need to provide a title for your campaign. After that, you can replace the images used in the template with your own, add your own text and branding.

Compose email

Click on the continue button when you are satisfied with the result.

Now you will reach the email options page. This is where you need to select which email list to use when to send an email, or change sender name and reply-to email address.

Email options

Once you are done, click on the Send Now or Schedule button to continue.

That’s all, you have successfully finished setting up your Constant Contact account.

Adding Constant Contact Signup Forms in WordPress

Now that you have set up your Constant Contact account, the next step is to collect email addresses by asking users to join your email list.

There are multiple ways to do this.

You can copy and paste the signup form code from your Constant Contact account to your WordPress site.

You can also use OptinMonster to add highly optimized signup forms to your WordPress site.

It will help you get many more email subscribers faster. See our case study of how we increased our email subscribers by 600% using OptinMonster.

We will show you both of these methods in this guide. Let’s get started.

Adding Default Constant Contact Signup Forms in WordPress

Constant Contact comes with built-in tools to create your email signup forms. You can then embed these forms into your WordPress site.

First, you need to login to your Constant Contact account and then click on ‘Contacts Growth Tools’ from the navigation menu on top.

Contacts growth tools

On the next page, you need to click on create a signup form button.

Create a signup form

This will bring you to the form builder wizard.

First, you need to provide the form name. This name will be used internally so that you can identify a form in Constant Contact dashboard.

Signup forms details

Next, you need to provide a title and tagline for your form. Both of them will be visible on your form.

Lastly, you need to select at least one email list. Users signing up using this form will be added to these lists.

Click on the continue button for the next step.

Now you need to add the fields you want to display on your signup form. The email address field is required.

You can click on ‘Additional fields’ to add more fields to your signup form.

Add fields to your email signup form

After adding the form fields, click on the continue button.

In the last step, you can choose your font color, background color, and add a logo.

Change form appearance

You can click on the preview button to see how your form looks. Once you are satisfied, click on the ‘Finish’ button.

You will be redirected back to the contacts growth tools page.

You need to click on the actions drop down menu and then select ‘Embed Code’.

Get embed code for your signup form

This will bring up a popup with the embed code to add your form anywhere. You need to copy this code and paste it into a text editor like Notepad.

Embed code for your signup form

Now visit your WordPress admin area and click on Appearance » Widgets.

From the list of available widgets, drag and drop the Text widget to a sidebar where you want to display your signup form.

Paste the code you copied from Constant Contact website in the widget’s text area. Once you are done, click on the save button to store your widget settings.

That’s all, you can now visit your website to see the signup form in action.

Constant Contact email signup form in WordPress

Adding Constant Contact Signup Forms with OptinMonster

While the basic forms are relatively easy to add, they are not ideal for high conversions.

An average user visiting your website spends very little time looking at the non-content element. You need email signup forms that grab your user’s attention.

This is where OptinMonster comes in. It is the most popular lead generation tool in the market. You can create beautiful sign-up forms that are optimized for conversions and A/B test them without hiring a developer.

OptinMonster comes with different kinds of signup forms such as exit-intent popups, floating bars, after post forms, sidebar forms, slide-in forms, full-screen welcome gates, and more.

You also get powerful features like MonsterLinks (2-step options), Scroll detection, A/B testing, page level targeting, and more.

OptinMonster works great with WordPress and all popular email service providers including Constant Contact.

Send WordPress Posts to Your Constant Contact Email List

Constant Contact makes it super simple to add your WordPress content into your email campaigns.

Note: Constant Contact does not currently offer automatic sending of blog posts to the email list.

First, login to your Constant Contact account and visit the Campaigns page. You need to click on the create button and then select send a new email.

Send an email

You will be asked to select a template for your email. After that you will reach the email builder screen.

From the left pane drag and drop the “Read More” block into your email preview. Next, click on the read more block in the email preview to edit it.

Add read more content block

This will bring up a popup window. You need to provide the URL of your WordPress blog post and click on the preview button.

Constant Contact will automatically fetch an image from your article and an article summary. You can click on the Insert button to add it to your email.

Fetch blog content into your email

Repeat the process to add more content from your WordPress blog into your email. Once you are done, go ahead and click on the continue button.

You will then reach the last step of creating your email. This is where you can select whether you want to send the email right away or schedule it.

That’s all, Constant Contact will now send your email with your blog content to your subscribers.

We hope this article helped you learn how to connect Constant Contact to WordPress.

Please follow us on Facebook, Twitter, Google+

Introducing Progressive Web Apps: What They Might Mean for Your Website and SEO

Introducing Progressive Web Apps: What They Might Mean for Your Website and SEO

Progressive Web Apps. Ah yes, those things that Google would have you believe are a combination of Gandhi and Dumbledore, come to save the world from the terror that is the Painfully Slow WebsiteTM.

But what actually makes a PWA? Should you have one? And if you create one, how will you make sure it ranks? Well, read on to find out.

What’s a PWA?

Given as that Google came up with the term, I thought we’d kick off with their definition:

The really exciting thing about PWAs: they could make app development less necessary. Your mobile website becomes your app.

Speaking to some of my colleagues at Builtvisible, this seemed to be a point of interesting discussion: do brands need an app and a website, or a PWA.

Fleshing this out a little, this means we’d expect things like push notifications, background sync, the site/app working offline. Having a certain look/design to feel like a native application, and being able to be set on the device home screen.

These are things we traditionally haven’t had available to us on the web.

But thanks to new browsers supporting more and more of the HTML5 spec and advances in JavaScript, we can start to create some of this functionality. On the whole, Progressive Web Apps are:

This method of loading content allows for incredibly fast perceived speed.

We are able to get something that looks like our site in front of a user almost instantly, just without any content.

The page will then go and fetch the content and all’s well. Obviously, if we actually did things this way in the real world, we’d run into SEO issues pretty quickly, but we’ll address that later too.

If then, at their core, a Progressive Web App is just a website served in a clever way with extra features for loading stuff, why would we want one?

The use case

Let me be clear before I get into this: for most people, a PWA is something you don’t need.

That’s important enough that it bares repeating, so I’ll repeat it:

You probably don’t need a PWA.

The reason for this is that most websites don’t need to be able to behave like an app.

This isn’t to say that there’s no benefit to having the things that PWA functionality can bring. But for many sites, the benefits don’t outweigh the time it takes to implement the functionality at the moment.

When should you look at a PWA then? Well, let’s look at a checklist of things that may indicate that you do need one…

Signs a PWA may be appropriate

You have:

  • Content that regularly updates, such as stock tickers, rapidly changing prices or inventory levels, or other real-time data
  • A chat or comms platform, requiring real-time updates and push notifications for new items coming in
  • An audience likely to pull data and then browse it offline, such as a news app or a blog publishing many articles a day
  • A site with regularly updated content which users may check into several times a day
  • Users who are mostly using a supported browser

In short, you have something beyond a normal website, with interactive or time-sensitive components, or rapidly released or updated content.

A good example is the Google Weather PWA:

Progressive Web Apps

If you’re running a normal site, with a blog that maybe updates every day or two, or even less frequently, then whilst it might be nice to have a site that acts as a PWA. There’s probably more useful things you can be doing with your time for your business.

How they work

So, you have something that would benefit from this sort of functionality, but need to know how these things work. Welcome to the wonder that is the service worker.

Service workers can be thought of as a proxy that sits between your website and the browser.

It calls for intercept of things you ask the browser to do, and hijacking of the responses given back.

That means we can do things like, for example, hold a copy of data requested.Sso when it’s asked for again, we can serve it straight back (this is called caching).

This means we can fetch data once, then replay it a thousand times without having to fetch it again.

Think of it like a musician recording an album. It means they don’t have to play a concert every time you want to listen to their music. Same thing, but with network data.

If you want a more thorough explanation of service workers, check out this moderately technical talk given by Jake Archibald from Google.

What service workers can do

Service workers fundamentally exist to deliver extra features, which have not been available to browsers until now. These includes things like:

  • Push notifications, for telling a user that something has happened, such as receiving a new message. Or that the page they’re viewing has been updated
  • Background sync, for updating data while a user isn’t using the page/site
  • Offline caching, to allow a for an experience where a user still may be able to access some functionality of a site while offline
  • Handling geolocation or other device hardware-querying data (such as device gyroscope data)
  • Pre-fetching data a user will soon require, such as images further down a page

It’s planned that in the future, they’ll be able to do even more than they currently can. For now, though, these are the sorts of features you’ll be able to make use of. Obviously, these mostly load data via AJAX, once the app is already loaded.

What are the SEO implications?

So you’re sold on Progressive Web Apps. But if you create one, how will you make sure it ranks?

As with any new front-end technology, there are always implications for your SEO visibility. But don’t panic; the potential issues you’ll encounter with a PWA have been solved before by SEOs who have worked on JavaScript-heavy websites.

For a primer on that, take a look at this article on JS SEO.

There are a few issues you may encounter if you’re going to have a site that makes use of application shell architecture.

Firstly, it’s pretty much required that you’re going to be using some form of JS framework or view library, like Angular or React. If this is the case, you’re going to want to take a look at some Angular.JS or React SEO advice.

If you’re using something else, the short version is you’ll need to be pre-rendering pages on the server. Then picking up with your application when it’s loaded.

This enables you to have all the good things these tools give you, whilst also serving something Google et al can understand.

Their recent advice that they’re getting good at rendering this sort of application. We still see plenty of examples in the wild of them flailing horribly when they crawl heavy JS stuff.

Assuming you’re in the world of clever JS front-end technologies, to make sure you do things the PWA way. You’ll also need to be delivering the CSS and JS required to make the page work along with the HTML.

Not just including script tags with the <code>src attribute, but the whole file, inline.

Obviously, this means you’re going to increase the size of the page you’re sending down the wire. But it has the upside of meaning that the page will load instantly.

More than that, though, with all the JS (required for pick-up) and CSS (required to make sense of the design) delivered immediately. The browser will be able to render your content and deliver something that looks correct and works straight away.

Again, as we’re going to be using service workers to cache content once it’s arrived, this shouldn’t have too much of an impact.

We can also cache all the CSS and JS external files required separately, and load them from the cache store rather than fetch them every time.

This does make it very slightly more likely that the PWA will fail on the first time that a user tries to request your site. But you can still handle this case gracefully with an error message or default content, and re-try on the next page view.

There are other potential issues people can run into, as well. The Washington Post, for example, built a PWA version of their site, but it only works on a mobile device.

Obviously, that means the site can be crawled nicely by Google’s mobile bots, but not the desktop ones.

It’s important to respect the P part of the acronym — the website should enable features that a user can make use of, but still, work in a normal manner for those who are using browsers that don’t support them.

It’s about enhancing functionality progressively, not demanding that people upgrade their browser.

The only slightly tricky thing with all of this is that it requires that, for the best experience, you design your application for offline-first experiences.

How that’s done is referenced in Jake’s talk above. The only issue with going down that route: you’re only serving content once someone’s arrived at your site and waited long enough to load everything.

Obviously, in the case of Google, that’s not going to work well. So here’s what I’d suggest…

Rather than just sending your application shell, and then using AJAX to request content on load, and then picking up, use this workflow instead.

  • User arrives at site
  • The site sends back the application shell (the minimum HTML, JS, and CSS to make everything work immediately), along with…
  • …the content AJAX response, pre-loaded as state for the application
  • The application loads that immediately and then pick up the front end.

Adding in the data required means that, on load, we don’t have to make an AJAX call to get the initial data required.

Instead, we can bundle that in too, so we get something that can render content instantly as well.

As an example of this, let’s think of a weather app. Now, the basic model would be that we send the user all the content to show a basic version of our app, but not the data to say what the weather is.

In this modified version, we also send along what today’s weather is, but for any subsequent data request, we then go to the server with an AJAX call.

This means we still deliver content that Google et al can index, without possible issues from our AJAX calls failing.

From Google and the user’s perspective, we’re just delivering a very high-performance initial load, then registering service workers to give faster experiences for every subsequent page and possibly extra functionality.

In the case of a weather app, that might mean pre-fetching tomorrow’s weather each day at midnight, or notifying the user if it’s going to rain, for example.

Going further

If you’re interested in learning more about PWAs, I highly recommend reading this guide to PWAs by Addy Osmani (a Google Chrome engineer), and then putting together a very basic working example, like the train one Jake mentions in his YouTube talk referenced earlier.

If you liked this article, then please find us on  Facebook, Twitter, Google+

SEO Netizens

ZIA AHSANzia ahsan

CEO, SEO Netizens

SEO Netizens is the Rock Star of Worldwide.

We SEO your Company by bringing you more Traffic and more Sales and Profits…………..

We completed lots of projects on SEO.
SEO Netizens one of the Top SEO provider in Bangladesh.

We have Clients from United States of America (USA), Australia, Canada, Brazil, United Kingdom (UK)……….

Beside that countries, lot of European countries also getting our White HAT Natural Content Based affordable and reliable SEO Services………..

Our SEO package always trusted by clients. A lot of Indian and Pakistani SEO farm getting SEO services from us………..

After any Google updates (Penguin, Panda, Hummingbird, Phantom, Payday Loan, Panda Recovery etc.) SEO Netizens never faced any Ranking problem cause we always follow Google rules. Besides that, we do SEO friendly Web Design and PSD to HTML & CSS.

*** Onpage optimization ***

*** Offpage optimization ***

*** Social Media Marketing ***

*** Keyword Research ***

***HTML 5***

Thanking You.

Zia Ahsan, Dhaka, BANGLADESH.

Cell – 01820.044.974


Why Important are Tags in 2017 for SEO

Why Important are Tags in 2017 for SEO  

If you want to improve the visibility of your website, increase traffic and boost your brand’s revenue, you need to run a strong SEO campaign.

While building backlinks to do SEO, developing your social media presence, and other off-site practices are great for boosting your site’s rankings, on-page optimization is still incredibly important.

Arguably, one of the most crucial aspects of on-page SEO is tags. Whether it’s title tags, header tags, meta tags or blog post tags, they have been demonstrated to increase traffic and boost engagement.

However, are they still as important and effective in 2016 as they have been in the past? In this article, we’ll take a look at the role of tags of every type, and explore their impact on SEO in 2016.


How Important are Tags in 2016 for SEO?

 A Brief History of Tags

Tags are generally used to classify content in a way that is useful for the reader and easy for search engines to understand, which potentially makes them incredibly important for both SEO and usability.

However, over the years, the way we use tags and their relative impact on rankings has changed. The key question is: tag as important now as they once were?

Meta tags have lost their power in a big way on rankings over the past several years and, as a natural result, the number of websites using them has vastly diminished. We’re going to discard those as being dead in the water in terms of SEO benefits.

However, is the same true for title tags, header tags, and blog post tags–are they as important for SEO in 2016 as they once were?

Let’s take a look at each in order to answer that key question.


How Important are Tags in 2016 for SEO?

Title Tags

As you probably know, title tags are used by search engines (in part) to determine a page’s topic and are also displayed in SERPs.

A good title tag will demonstrate what the user can expect from the page before they actually click. In this way, they are a strong determiner of click-through rates. But how do they affect your site’s SEO?

How Important are Title Tags in 2016 for SEO?

For many years, title tags have been considered one of the most important factors of on-page SEO. In fact, in the past, title tags were seen by many as only second to good old fashioned keyword stuffing in terms of importance. But are they as important in 2016?

According to 2016 research from Backlinko.com, Google’s shift toward semantic search could affect the relative importance of the title tag.

The researchers found that a keyword-optimized title tag was associated with a better ranking, but that the correlation was smaller than it once was.

Findings suggest that Google no longer requires your title tag to include an exact keyword in order to interpret a page’s subject matter.

For example, if you type “how to start a business” into Google, only six out of the ten top pages include an exact match keyword in their title tag.

That said, search engines will still compare your title tag to other content on your page, to ensure keyword consistency when indexing and ranking web pages, still making them an essential part of SEO.

In other words, title tags are still an important part of on-site SEO, but they are far from the be-all and end-all.

Header Tags

For the purposes of this article, header tags refer to the HTML markup used to distinguish headings and subheadings within your content from other types of text (e.g. paragraph text). They run from h1–h6, historically in a sense of ‘importance’.

The usage of header tags these days is the source of some debate. Before the advent and growing popularity of HTML5, it was typical to include just one h1 tag within your content, and the contents of that tag were seen to be pretty influential in terms of on-site SEO.

However, these days, it is possible to utilize multiple h1 tags on a per-section basis, thus arguably lessening the importance of the hierarchy of header tags and encouraging search engines to be less simplistic in their analysis of any given page.

How Important are Header Tags in 2016 for SEO?

Searchmetrics’ 2015 Ranking Factors reported that two in every five web pages in SERPs didn’t utilize h1 tags at all. Was this simply a sign of lazy web design, or a reflection of the relative unimportance of header tags?

On the contrary, the number of pages using h1 tags has increased compared to 2014. In the top 30, this ratio has increased by 4%. On that basis alone, it would seem that the web designers of today consider header tags to be more important than they did previously.

Furthermore, several case studies have highlighted the importance of using header tags effectively. For example, SearchEccentric worked with Motor Cars Ltd. in overhauling their header tags to be more SEO-friendly.

Rankings leaped accordingly, with one keyword, in particular, jumping from 320 in the SERPs to the top spot.

In terms of on-site SEO, header tags are certainly here to stay–it has been demonstrated that careful optimization can lead to major ranking increases.

Blog Post Tags

Most blogging platforms–like WordPress–provide you with the ability to add contextual tags to your posts. We refer to these as “blog post tags” in this article, in order to differentiate them from other types of tags.

Blog post tags are part of your site’s taxonomy. WordPress and other blogging platforms utilize taxonomies to classify and better organize information. They provide visitors with a list of posts grouped by generally more specific topics than the categories.

If you think of your site as a book, with categories as your website’s table of contents and tags as your index, you won’t go too far wrong.

For example, if you run a fitness blog, you might have categories like “Diet”, “Workouts”, and “Fitness Tips”. Those three are broad terms that you would use to categorize posts. When you write a post and put it in the workout category, you might enter tags like, “pushups”, “squats” and “lunges”, if the post features them.

These tags can be valuable to your site’s visitors and to search engines. For visitors, it improves the usability of your website in terms of being able to identify posts that cover specific topics.

For search engines, it makes interpreting the page’s content easier and can ultimately aid your site in ranking better.

How Important are Blog Post Tags for SEO in 2016?

Blog post tags do not necessarily improve search engine rankings in and of themselves, but, while they might not be directly influential, they can improve SEO indirectly.

For starters, though most search engines don’t rank category and tag pages highly in the SERPs in 2016, high-quality tagging makes it easier for Google to see what your website is all about.

For example, if you run a food blog that often focuses on vegan desserts, and you have a tag page for vegan desserts that links to many different pages and has various posts linking back to it, it sends a strong signal to search engines that vegan desserts are a big part of your site.

Furthermore, while tag and category pages aren’t necessarily ranked highly, they are still ranked—meaning they are a viable traffic source. Blog post tags not only provide you with another source of traffic, they also improve the user experience.

Using tags meticulously in posts makes it easier for visitors to find what they’re looking for on your site. Blog post tags can lower your bounce rate and increase time on site–both behavioral factors that Google take into account–as they make websites easier to navigate (when utilized effectively).

They provide the user with a convenient way to access relevant content and, if the user easily finds what they are looking for, they’re much more likely to stay on your site.

Google’s focus on user intent and perceived quality of experience are only set to increase in the future; as of now, they have evaluators manually trawling SERPs and ‘grading’ websites based upon subject markers of ‘quality’.

Those who don’t think to provide a good user experience matters to SEO are quickly falling behind the times.

Our point is this: If you can provide a high-quality user experience that compels visitors to visit multiple pages and stay on your site for long periods of time, you can expect to benefit in terms of SEO.

Effective tagging can represent one piece of the puzzle in terms of improving the user experience, and ultimately benefit your rankings, even if not directly.

Don’t Miss out–Up Your SEO Game With Tags

To get the most out of your SEO strategy, you need to use tags. Optimizing your content with relevant and useful tags will improve the visitor experience and boost your rankings.

Now it’s over to you. What’s your opinion on the use of title, header, and blog post tags for SEO purposes? Let us know in the comments section below!


Please follow us on Facebook, Twitter, Google+


Design a site like this with WordPress.com
Get started